


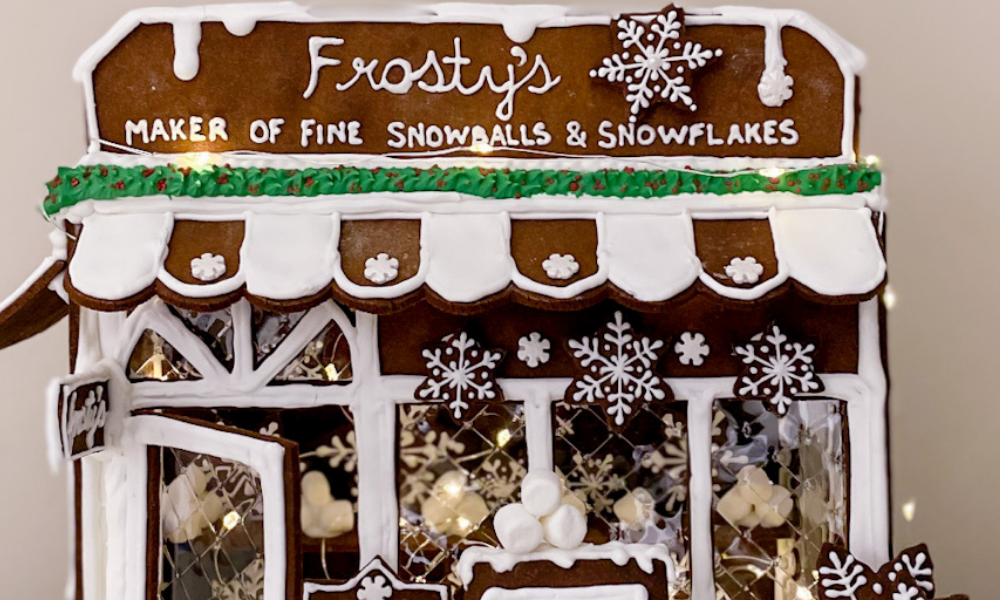
Frosty’s Gingerbread Shop
Difficulty
I’m thrilled to be sharing with you my latest gingerbread house project – Frosty’s gingerbread shop that sells snowballs and snowflakes. I’m so happy with how it turned out and have been dying to share this with you since I completed this a week ago! Having worked on 2 gingerbread projects now, I’ve come to realize that building gingerbread houses gives me a lot of joy. There’s something about creating a house from scratch – from concept, to drafting and finally, decorating, makes me so happy!


The Concept
I don’t know how others do it, but it takes me a long time to settle on a design. That happened with my Haunted Victorian Mansion and again with this – Frosty’s gingerbread shop. While I love traditional gingerbread houses, I knew I wanted to create something different. And being a Christmas project, it had to be something magical. I tossed around so many ideas and finally decided on a shop. But what would I fill it with? And then it came to me! My little shop would sell snowballs and snowflakes. I mean, who sells snowfalls and snowflakes? It’s the absurdity of this shop that made this project so much fun!


Frosty’s Gingerbread Shop needed a lot more dough than expected!
Frosty’s Snowball and Snowflake Shoppe took about 15 hours to complete. I spent 2 evenings designing the various elements. And being naturally impulsive, I had to start the dough at 9pm on a Friday night. And because this shop is huge, (it measures 11 inches wide by 6 inches deep and 8 inches tall), I ran out of dough halfway through the baking process and had to stop to make another batch of dough. But now I know! This house needs a double batch of gingerbread dough. For the dough recipe, click here. But remember to double it!


Also needed more Royal Icing!
By the time I finished baking the pieces, it was well after 1am but I was up before 6am the next morning to start decorating, even before coffee was made! Haha! Since I had liquid egg white in the fridge and knowing that I needed a lot more icing than my Haunted Victorian Mansion, I decided to make my royal icing with pasteurized egg whites instead. Did you know that pasteurized egg whites are more ideal than regular egg whites for making royal icing? If no, check this out! And like the dough, I found that I needed 1.5x more icing than I’d originally expected. My recipe for Royal Icing using liquid egg whites is below.


How I wish this shop existed!
Anyway, there’s my finished shop! I am so in-love with how it turned out and now have it sitting on my mantel where the scent of delicious gingerbread fills the air. I’ve also added some fairy lights to the inside of the house which makes it look so Christmas-y. Every time I walk by, I cannot help but stop to check out the shop. How this gingerbread house turned out is exactly how I imagine a North Pole shop to look like – a little whimsical, a little silly, a little absurd, yet at the same time, magical. Makes me wish that I were an elf and lived in the North Pole, just so that I could visit this store. How I’d love to purchase some handmade snowballs and one-of-a-kind snowflakes. I enjoyed every moment building this project and hope you will too. It’s gingerbread houses like this that brings me back to my childhood and makes me believe in Santa all over again.

Here’s the template for Frosty’s gingerbread shop. Please note that elements such as the sandwich board, cart with wheels and assorted size snowflakes are not included.
ROYAL ICING FOR FROSTY’S GINGERBREAD SHOP
- 3/4 cup(180ml) Liquid Egg Whites
- 3/4 tspCream of Tartare
- 6 cups(780g) Confectioners’ Sugar
Instructions:
Add liquid egg whites to a stand mixer outfitted with a whisk attachment.
Whisk on high until frothy, approximately 5 minutes. Add cream of tartare and 1/4 of the confectioner’s sugar. MIx on low until mostly combined. Add another 1/4 and mix. Repeat.
Once the mixture is combined, turn speed up to high and whip until the mixture forms stiff peaks – approximately 10 minutes.
Transfer to a ceramic bowl and tightly seal with plastic wrap until needed.
When ready to use, transfer a portion into piping bags and tightly seal the rest with plastic wrap.