


Serving
Cooking Time
Difficulty
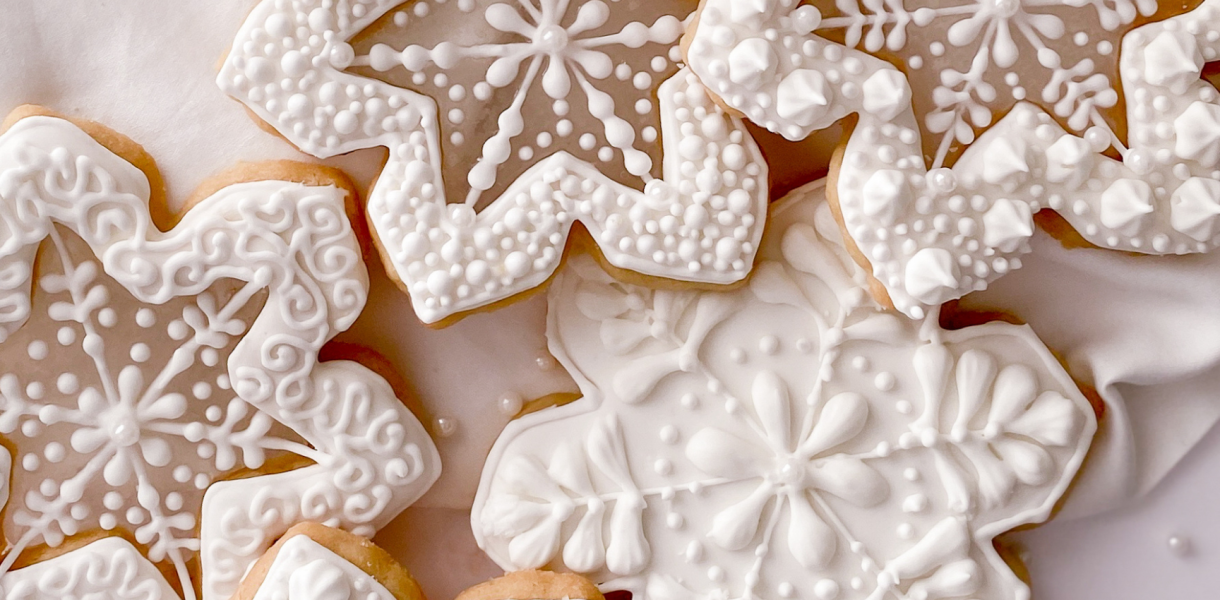
Happy New Year my friends! Here’s to a brand-new year filled will laughter, joy and all things food good! Seeing that we’re still under a blanket of snow in Vancouver and since I’m house bound because I hate driving in the snow, I decided to make these Glass Snowflake Butter Cookies. Aren’t they pretty?
If you’ve never made anything with Isomalt before, now is the time. Isomalt is a sugar-free substitute made from beets. Just like granulated sugar, it’s white, granular, and odorless. When heated, isomalt melts just like sugar does, but does not caramelize. Instead, it remains clear, hence it’s a great medium used by bakers to create design elements like windowpanes, gemstones, and even glass-like domes.
I used isomalt to create the centers of my glass snowflake butter cookies giving them that translucent glass-like quality. I also like that I’m able to pipe directly on the isomalt once it’s cooled giving the cookies a pretty and delicate appearance.
If you’re house bound like I am, I highly recommend you try your hands at these glass snowflake butter cookies. Not only are they fun to make, they’re also fun to eat. The cookies themselves are super buttery and melt in your mouth tender while the royal icing and the isomalt lend a crunchy element to the cookies. Since I absolutely love the look of my glass snowflake butter cookies, should you make these, please be sure to let me know by commenting below or tagging me on Instagram. My Instagram handle is @karen.t.ology I’d love to check out your creations!
If you love snowflakes as much as I do, check out my Thin and Crips Snowflake Gingerbread cookies! They’re delicious and are one of my all-time favorite cookies!

Glass Snowflake Butter Cookies
Makes 10 to 12 large 5” snowflake cookies
- 2-1/8 cups(255g) All-Purpose Flour
- 1 cup(227g) Butter, Softened
- 1/2 cup(100g) Granulated Sugar
- 1Large Egg
- 1 cupIsomalt (I used this)
- 1/4 cupWater
- 3 oz(6 tbs) Pasteurized Egg Whites
- 1/4 tspCream of Tartare
- 4 cups(500g) Confectioners’ Sugar, Sifted
- 1 tspClear Vanilla Extract
Instructions:
- In a stand mixer, outfitted with a paddle attachment, cream butter and sugar together until light and creamy.
- Add egg yolks and vanilla. Beat for about a minute until combined, scraping down the bowl as needed.
- Add the flour and mix until dough clumps together. Do not over mix.
- Transfer dough from the stand mixer onto a well-floured working surface. Divide the dough into 2 portions. Roll each of the portions out to 1/4” thickness. Wrap in plastic wrap and place in the refrigerator to chill for at least 2 hours. Repeat with the other portion of dough.
- Once chilled, working with 1 portion at a time, remove the rolled-out dough from the refrigerator. Using a large snowflake cookie cutter (preferably a 5” cookie cutter) cut out snowflake shapes. Then using a smaller snowflake cutter (approximately 3” in diameter), cut out the middle of each snowflake. Gather the scraps, roll and cut out more cookies. Place the cutout snowflakes 3 inches apart on a parchment lined cookie sheet. Place the cookies back into the refrigerator to chill for at least 30 minutes. Repeat with the other piece of dough.
- Preheat oven to 350 degrees Fahrenheit.
- Bake for 11-12 minutes until barely golden around the edges.
- Remove from the oven. Allow cookies to cool on the tray for 15 minutes before moving them onto a baking rack to finish cooling.
For the Isomalt:
- Heat oven to 275 degrees Fahrenheit.
- In an oven-safe saucepan, combine the isomalt and water.
- Stir over medium heat until the isomalt crystals dissolve.
- Insert candy thermometer and continue cooking without stirring until the thermometer reads 320 degrees Fahrenheit.
- Remove from the heat and place the pan directly into the oven for 15 minutes to help release the air bubbles. This will give you a clear, bubble free glass-like appearance.
- While isomalt is in the oven, line a cookie sheet with a new piece of parchment paper. Do not reuse the ones you’d baked the cookies on. Transfer cookies onto the new parchment paper.
- Using oven mitts, remove the pan from the oven, Note: isomalt is extremely hot and can cause severe burns. Pour the isomalt into the center of each cookie, making sure to flood the entire middle before moving on to flood the next cookie. If isomalt hardens, return the pan to the oven to melt the isomalt.
- Allow isomalt to set, approximately 15 minutes. Isomalt will still be sticky. You can go ahead and ice the cookies at this time. However, if possible, best to wait at least 24 hours before icing the cookies. Ice cookies as usual. Store cookies in an air-tight container. Enjoy!
Royal Icing
In a stand mixer or using an electric mixer, whisk egg whites with cream of tartare until foamy. With the machine on low speed, gradually add the confectioners’ sugar, whisking in between until fully incorporated. Increase speed to high and continue whisking until mixture is very thick and forms stiff peaks. Transfer royal icing into a piping bag and pipe as usual. Store any unused royal icing in an airtight container to prevent icing from drying out.