


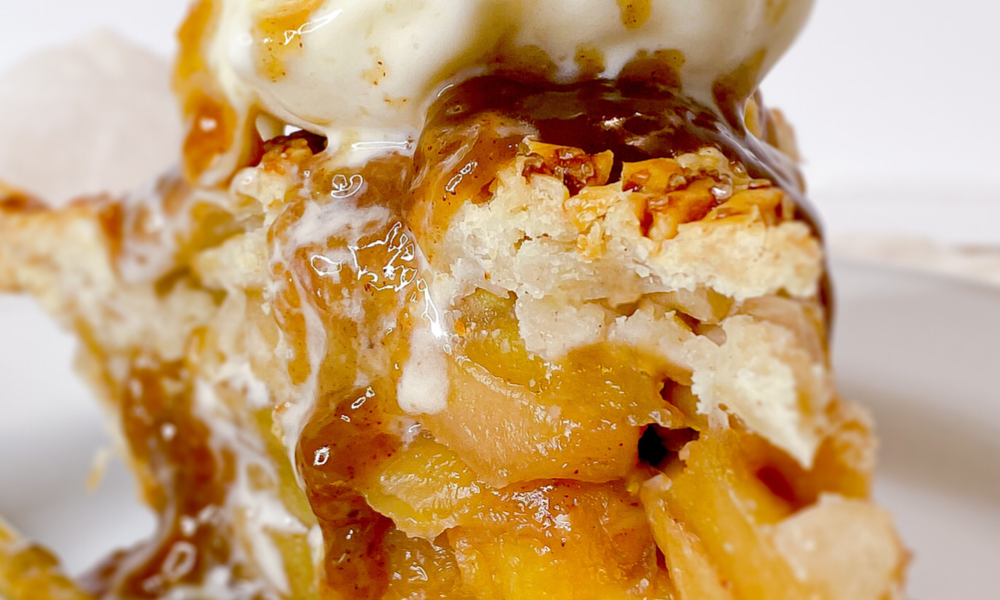
Maple Roasted Apple Pie with Maple Apple Caramel Sauce
Serving
Cooking Time
Difficulty
Where would you hide 5lbs of apples? I like hiding them in my Maple Roasted Apple Pie with Maple Apple Caramel Sauce. It’s incredible that 5lbs of apples fit into this 9” pie dish. No doubt that the pie was tall, even after baking – 4-1/2” tall to be exact! So, if you or the apple of your eye (see what I did there), love apple pie, then this is the recipe for you!

What makes this pie special
My maple roasted apple pie, with maple caramel starts with, yes, I’m going to say it again, 5lbs of apples! Peeled, cored and cut into eighths, these apples are then tossed in a mixture of maple syrup, maple sugar and cinnamon, and left to macerate before roasting them in the oven. Once roasted, the apples are drained of their juices. While the roasted apples are used to build the maple roasted apple pie, the juices are set aside to make the maple apple caramel sauce.
The crust is a delicious, ever-so-slightly sweet, shortcrust dough that you do not need to prebake. Unlike traditional apple pie where there’s a chance of the crust getting soggy, the roasting of the apples prevents this from happening. The crust bakes up beautiful and is crisp and buttery. This maple roasted apple pie may be served on its own, topped with a drizzling of the maple apple caramel, or served ala mode, with a drizzle of the maple apple caramel sauce. Whichever way you decide to serve this, it’s sure to be a hit amongst apple pie lovers. So, what’s the secret to this pie? The roasted apples, of course!


Reasons for roasting apples for your pie
So why roast apples before adding them to a pie? For one, it helps render the juices from the apples – thus, reducing the chances of having a soggy crust. As you know, apples are juicy, and when you bake apples, the juices run. And if the apples are encased in a pie, guess where the juices go? That’s right, they go right into the pie shell which means, you guess it, a soggy bottom pie crust.
Another reason for roasting apples is to pre-shrink them before you fill your pie. Have you filled an apple pie full of apples, baked it, to only find a large gap between your pie filling and the top crust? That’s because your apples shrank while baking. Roasting the apples ahead of time, prevents this from happening. The roasted apples maintain their size in the pie, even after baking and when you slice into the pie, you won’t get that ugly large air pocket. What you’ll get is a slice of apple pie that packed full of apples from the bottom crust right up to the top!
The last reason for roasting apples before baking is to help concentrate the apple flavour. Have you wished that your apple pie tasted more apple-y? Roasting your apples before baking will help you achieve that concentrated apple flavour! It’s a little more work than your usual apple pie but once you’ve tasted an apple pie made this way, I guarantee you’ll never bake another apple pie the old way again!

Best apples for apple pie
It’s important to use the right apples to ensure that your apples aren’t mushy after roasting. My favorite apples for roasting is the Envy Apple from New Zealand. They are a cross between Royal Gala and Braeburn apples. They are sweet, juicy, and crunchy. They also hold up well to roasting. If you can’t get Envy apples, I highly recommend using Honey Crisp, Gala, Braeburn, Pink Lady, Courtland, and Fuji apples.
So, what are you waiting for? Run and bake up this Maple Roasted Apple Pie with Maple Apple Caramel Sauce for the apple of your eye!
For an impressive fall dessert that’s sure to impress your guests, please check out my recipe for vegan Mini Pumpkin Spice Cakes here.

Maple Roasted Apple Pie with Maple Apple Caramel Sauce
Makes one 9” pie
- 5 lbsEnvy Apples, Peeled, Cored and Cut into Eighths
- 3/4 cup(180ml) Maple Syrup
- 1/2 cup(100g) Maple Sugar
- 1 tspGround Cinnamon
- 6 tbs(85g) Butter, Soften
- 4 cups(480g) All-Purpose Flour
- 1 tspFine Sea Salt
- 2 tbsGranulated Sugar
- 1/2 cup(113g) Cold Unsalted Butter, Cubed
- 1/2 cup(113g) Cold Shortening, Cubed
- 2-3 tbs(30-45ml) Ice-Cold Water
- 1 Egg washEgg Beaten with 1 tbs Cold Water
- 1-1/2 tbsTurbinado or Raw Sugar
- Juices From Both Macerated and Roasted Apples
- 1/2 cupHeavy Cream
Instructions:
Filling:
- In a large mixing bowl, add the apples, maple syrup, maple sugar and cinnamon.
- Using a silicon spatula, mix until the apples are well coated with the maple sugar mixture. Set aside to macerate for 2 hours.
- Nearing the 2 hour mark, preheat oven to 400 degrees Fahrenheit.
- Line a large, rimmed baking sheet with parchment paper. Arrange apples in a single layer in the baking sheet. Reserve juices and set aside. Dot apples with butter.
- Roast apples for about 30-35 minutes until tender but firm. Remove from the oven and set aside to cool completely. While apples are cooling, make the pie crust.
Crust:
- To a food processor, add the flour, salt, and sugar. Pulse to combine.
- Add the cold cubed butter and shortening to the flour mixture and continue pulsing until the mixture resembles coarse meal.
- With the machine running, add 1 tablespoon of the ice-cold water. Stop as soon as the mixture starts to come together and forms a dough. If required, add more water, a teaspoon at a time to help the dough come together.
- Remove the dough and divide into 2 equal portions. Pat each portion into a 1/2” thick flat disk, wrap each disk with plastic wrap and chill in the refrigerator for at least 1 hour.
- Once chilled, working with one disk at time, on a well-floured surface, roll the dough into a 13” circle, approximately 1/8” thick. Lift and place rolled out dough onto a 9” pie dish, lightly pressing the sides to conform the dough to the pan. Trim dough so that it extends beyond the rim of the pie plate by 1”. Tuck ½” of the dough under itself to create a thick edge. To crimp the edges, press the index finger on one hand between the thumb and index finger on the other hand. Set aside.
- To create the top crust, roll out the 2nd piece of pastry dough to about 1/8″ thickness. Using a leaf cutter complete with built in stamp, cut out about 120 leaves. Set aside.
- Using a slotted spoon, transfer the cooled apple pieces into the pie crust, creating a domed effect. Reserve the juices for the caramel sauce.
- To create the look of a pile of fallen leaves, top the apples with overlapping pieces of the dough leaves.
- Gently brush the leaves with the egg wash and sprinkle liberally with turbinado or raw sugar. Place the pie in the freezer to chill for 15-20 minutes while preheating the oven.
- Preheat oven to 375 degrees Fahrenheit. Move the oven rack to the lowest position. If using a baking stone, place the baking stone in oven at this time.
- Remove the pie from the freezer and place on a cookie tray to catch any drips. Place the cookie tray directly on the baking stone (if using). Bake in the oven for about 65-75 minutes until the top crust is golden. At the 45-minute mark, check your pie crust. Should you find that the crust is browning too quickly, place a piece of aluminum foil over the crust and continue baking.
- Remove from the oven, allow the pie to cool before slicing. Serve with a scoop of vanilla ice cream and a drizzle of Maple Apple Caramel Sauce. Enjoy.
Maple Apple Caramel Sauce:
Add the juices from the macerated and roasted apples to a small saucepan. Without stirring, bring mixture to a boil over medium heat. Turn heat to low and allow mixture to simmer without stirring until bubbly and thickened, approximately 10 minutes. When mixture is thick enough to coat the back of a wooden spoon, add the heavy cream. Simmer for a few minutes more, stirring in between. Remove from heat and allow mixture to cool. Mixture will thicken slightly once cooled. To serve, heat the sauce in the microwave for about 20 seconds or until warm to the touch. Drizzle over Maple Roasted Apple Pie or over ice-cream. Refrigerate leftovers. Delicious!